Quick Start
Install and Access ArkKVM
Getting ArkKVM up and running only takes a few minutes. Follow the steps below to start controlling your computer remotely.
-
Connect USB-C
- Connect the USB-C port on ArkKVM to a USB port on the computer you want to control.
-
Connect HDMI
- Plug an HDMI cable from ArkKVM to the HDMI port on the computer.
-
Connect to the Network
- Insert an Ethernet cable into the ArkKVM Ethernet port and connect it to your router or network switch.
-
Check the IP Address
- When powered on, the front display of ArkKVM shows the device IP address after startup.
-
Access the Web Interface
- Open a web browser and enter the IP address shown on the ArkKVM display.
- You can now control the computer remotely through the ArkKVM web interface.
ATX Power Control Extension
Remotely power on, reset, and monitor your PC while keeping your front panel buttons and LEDs working.
What You'll Install
- ATX Extension Board — installs inside your PC case (like a slot cover)
- RJ12 Cable — connects the ATX board to ArkKVM
- Brackets — fit different case sizes
- DuPont cable — connects the ATX board and motherboard
Before You Start
- Shut down your PC.
- Turn off the PSU switch.
- Unplug the power cable.
- Touch metal (case frame) to discharge static.
Step 1 — Connect to Your Motherboard (Important)
This is the most critical step.
- Locate the
F_PANELheader on your motherboard.- Usually labeled:
F_PANEL,PANEL1.
- Usually labeled:
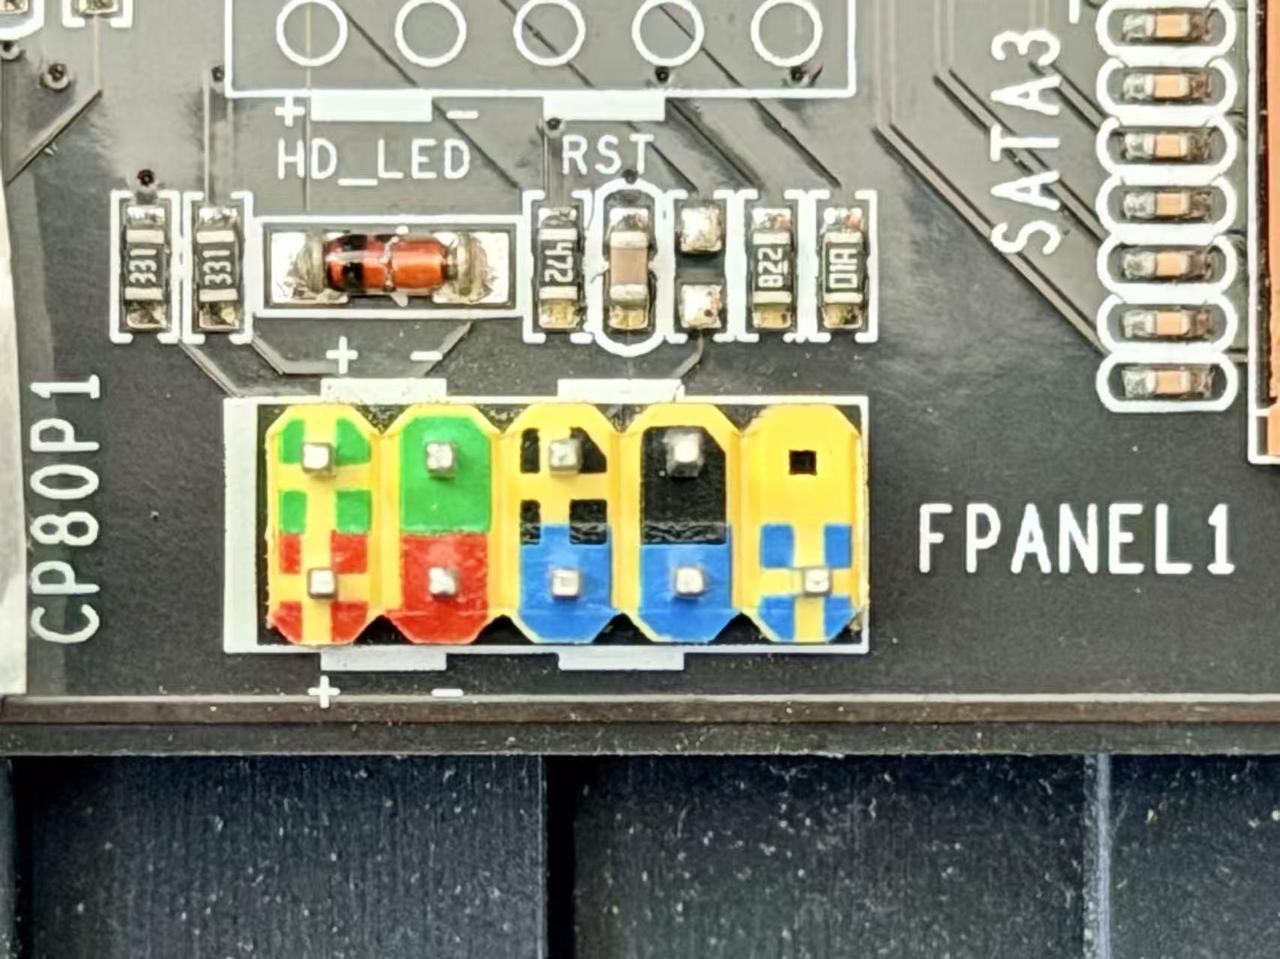
- Disconnect your case front panel cables from the motherboard (if connected).
- Connect the motherboard to the ArkKVM ATX board using the included DuPont cables
- Match each pin by label
- Common labels include: PWR, RST, PWR LED, HDD LED
- These labels may appear on:
- The motherboard
- The DuPont cable connectors
- The ArkKVM ATX board Make sure each signal is connected one-to-one (e.g., PWR → PWR, RST → RST)
Pay special attention to polarity (+ / –) for LED pins (PWR LED, HDD LED)
- Incorrect polarity won’t damage the device, but LEDs may not work properly
If unsure, check your motherboard manual.
Step 2 – Reconnect Your Case Buttons (Optional)
If you still want to use your case power/reset buttons:
- Connect your case front panel cables to the ArkKVM ATX board
- Match the labels:
- Power Switch
- Reset Switch
- Power LED
- HDD LED
LED cables must match polarity (+/–), or they won’t work
Step 3 — Install the ATX board
- Select the appropriate bracket (full-height or low-profile) based on your PC case, and secure it to the ATX board using the provided screws
- Find an empty PCI/PCIe slot opening (no electrical connection needed)
- Insert the ATX board into the slot opening
- Secure it to the case with the included screw
Step 4 — Connect to ArkKVM
Use the RJ12 cable to connect:
ATX board ⇄ ArkKVM
When ArkKVM is powered, it can supply power to the ATX board, so you do not need to connect the ATX board’s USB-C port.
If you do connect the ATX power control board’s USB-C port to an external power adapter, ArkKVM will instead be powered by the ATX board.
Step 5 — Power On and Test
- Power your system back on
- Open a browser and enter ArkKVM’s IP address
- Go to ATX Power Control
You should now be able to:
- Power on the PC
- Reset the PC
- Check the remote PC's status
Done
Your ArkKVM is now fully connected to your PC's power controls and ready for remote operation.